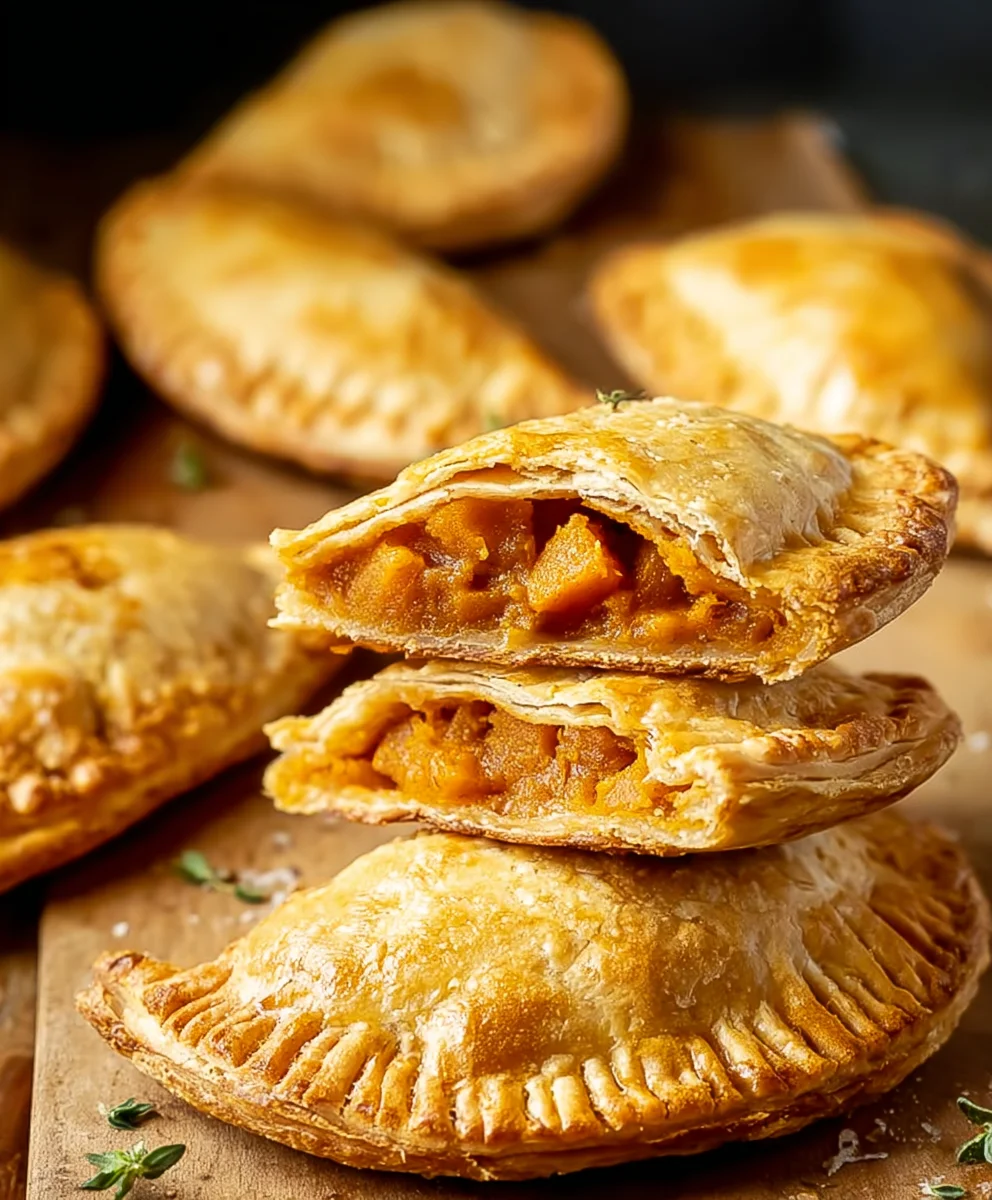
Pumpkin Hand Pies are an absolute quintessential treat, particularly as the vibrant hues of autumn begin to paint our world. I am so excited to share with you a recipe that captures all the comforting essence of a traditional pumpkin pie, but in a wonderfully convenient, portable format. Imagine biting into a perfectly golden, flaky crust, giving way to a rich, spiced pumpkin filling that simply melts in your mouth. This isn’t just any dessert; it’s a little parcel of autumnal joy.
Historically, pumpkin has been a cornerstone of fall harvests and celebratory feasts, especially during holidays like Thanksgiving. While the classic pumpkin pie has long held its revered place at the dessert table, these individual hand pies offer a charming and practical twist on that beloved tradition. They embody the nostalgia of home baking while fitting seamlessly into our modern, on-the-go lifestyles.
Why do people universally adore these delightful creations? It’s the harmonious blend of textures and flavors. The buttery, tender pastry provides the perfect counterpoint to the creamy, warmly spiced pumpkin filling, infused with cinnamon, nutmeg, and a touch of ginger. Moreover, their individual serving size makes them incredibly appealing. No need for plates or forks; these are the ultimate grab-and-go dessert, perfect for school lunches, office treats, festive gatherings, or a cozy evening by the fire. I am confident that these homemade Pumpkin Hand Pies will quickly become a cherished favorite in your autumn repertoire, bringing warmth and smiles with every delightful bite.

Ingredients:
-
For the Flaky Pie Dough:
- 2 ½ cups (300g) all-purpose flour, plus more for dusting
- 1 teaspoon salt
- 1 cup (226g) unsalted butter, very cold and cut into ½-inch cubes
- ½ cup (120ml) ice water, plus 1-2 tablespoons more if needed
- 1 tablespoon granulated sugar (optional, for a slightly sweeter crust)
-
For the Rich Pumpkin Filling:
- 1 (15-ounce / 425g) can pure pumpkin puree (make sure it’s not pumpkin pie filling)
- ½ cup (100g) light brown sugar, packed
- ¼ cup (50g) granulated sugar
- ½ cup (120ml) heavy cream
- 1 large egg
- 1 tablespoon cornstarch (or all-purpose flour for a slightly thicker filling)
- 1 teaspoon ground cinnamon
- ½ teaspoon ground ginger
- ¼ teaspoon ground nutmeg
- ⅛ teaspoon ground cloves (optional, but highly recommended for depth)
- ¼ teaspoon salt
- 1 teaspoon vanilla extract
-
For the Egg Wash and Topping:
- 1 large egg yolk
- 1 tablespoon milk or water
- 2 tablespoons turbinado sugar (or granulated sugar), for sprinkling
Preparing the Flaky Pie Dough:
- Combine Dry Ingredients: In a large mixing bowl, I start by whisking together the 2 ½ cups of all-purpose flour, 1 teaspoon of salt, and the optional 1 tablespoon of granulated sugar. This ensures all the dry ingredients are evenly distributed, which is crucial for a consistent crust.
- Cut in the Cold Butter: Next, I add the 1 cup of very cold, cubed unsalted butter to the flour mixture. It’s incredibly important that the butter is as cold as possible; this is the secret to a flaky crust. Using a pastry blender, two knives, or even my fingertips, I work the butter into the flour until the mixture resembles coarse meal with some pea-sized pieces of butter still visible. Don’t overwork the butter; those small chunks will create steam pockets during baking, leading to that coveted flakiness in our Pumpkin Hand Pies.
- Add Ice Water Gradually: Now it’s time for the liquid. I gradually add the ½ cup of ice water, one tablespoon at a time, mixing gently with a fork or my hands until the dough just begins to come together. I’m careful not to add too much water; the dough should be moist enough to hold together when squeezed, but not sticky. Depending on the humidity and your flour, you might need an extra 1-2 tablespoons of ice water. Stop mixing as soon as the dough forms a ball; overmixing develops gluten, which can lead to a tough crust.
- Divide and Chill: I gently gather the dough and divide it into two equal portions. Each portion is then flattened into a disc, wrapped tightly in plastic wrap, and placed in the refrigerator for at least 1 hour. Chilling is non-negotiable! It allows the gluten to relax, making the dough easier to roll, and re-solidifies the butter, which is essential for that beautiful flakiness. I often make my dough a day in advance; it’s perfect for these Pumpkin Hand Pies.
Crafting the Velvety Pumpkin Filling:
- Combine Wet Ingredients: In a medium bowl, I combine the 1 (15-ounce) can of pure pumpkin puree, ½ cup of heavy cream, and 1 large egg. I whisk these together until they are well blended and smooth, creating a creamy base for our filling.
- Add Sugars and Spices: To the wet mixture, I then add the ½ cup of light brown sugar, ¼ cup of granulated sugar, 1 tablespoon of cornstarch (or flour), 1 teaspoon of ground cinnamon, ½ teaspoon of ground ginger, ¼ teaspoon of ground nutmeg, ⅛ teaspoon of ground cloves (my secret weapon for extra warmth!), and ¼ teaspoon of salt. These spices are what truly bring out the festive flavors of these Pumpkin Hand Pies.
- Whisk Until Smooth: I whisk everything thoroughly until all the ingredients are fully incorporated and the mixture is completely smooth. There should be no lumps of cornstarch or spices. Finally, I stir in the 1 teaspoon of vanilla extract. Taste the filling at this point (before the raw egg, of course, if you’re concerned) and adjust spices to your preference. If you prefer a bolder spice profile, a pinch more cinnamon or ginger won’t hurt!
- Set Aside: Once the filling is perfectly smooth and fragrant, I set it aside. It doesn’t need to be chilled, but ensuring all the ingredients are well-mixed is key.
Assembling Your Delightful Pumpkin Hand Pies:
- Preheat Oven and Prep Baking Sheets: Before I start rolling the dough, I preheat my oven to 400°F (200°C). I also line two large baking sheets with parchment paper; this prevents sticking and makes cleanup a breeze for our Pumpkin Hand Pies.
- Roll Out the Dough: I retrieve one disc of chilled dough from the refrigerator. On a lightly floured surface, I roll out the dough to an even thickness of about ⅛-inch. I try to keep it as close to a rectangular or square shape as possible to minimize scraps. The exact dimensions aren’t critical, but aim for something around 12×15 inches if you can. If the dough starts to become difficult to work with or sticky, pop it back in the fridge for 10-15 minutes to re-chill.
- Cut Out Shapes: Using a 3.5 to 4-inch round or square cookie cutter (or even a clean jar lid), I cut out as many shapes as possible from the rolled-out dough. I gently gather the scraps, re-roll them, and cut out more shapes until most of the dough is used. For a rustic look, you can also use a knife to cut out rectangles. Aim for approximately 12-16 shapes per dough disc, meaning 24-32 total pies.
- Fill the Pies: I place half of the cut-out dough shapes onto the prepared baking sheets. In the center of each dough circle (or square), I spoon about 1-2 tablespoons of the pumpkin filling. It’s important not to overfill, as this can lead to messy leaks during baking. I leave about a ½-inch border around the edge for sealing.
- Moisten and Seal: I lightly moisten the edges of the filled dough circles with a little water using my fingertip or a pastry brush. Then, I take the remaining half of the cut-out dough shapes and carefully place one on top of each filled circle, aligning the edges.
- Crimp the Edges: To seal the Pumpkin Hand Pies, I gently press down around the edges with my fingers, then use the tines of a fork to crimp all around the perimeter. This not only creates a decorative edge but also ensures a tight seal, preventing the filling from escaping. A good seal is vital!
- Vent the Pies: With a sharp knife or skewer, I make two or three small slits on the top of each hand pie. These vents allow steam to escape during baking, preventing the pies from puffing up excessively or bursting open.
- Chill Again (Optional but Recommended): For the flakiest crust and best shape retention, I like to transfer the assembled hand pies back to the refrigerator for about 15-20 minutes. This re-chills the butter in the dough, making it more robust for the oven.
Baking to Golden Perfection:
- Prepare Egg Wash: While the hand pies are chilling, I prepare the egg wash. In a small bowl, I whisk together the 1 large egg yolk and 1 tablespoon of milk or water until smooth. This wash will give our Pumpkin Hand Pies a beautiful golden sheen.
- Apply Egg Wash and Sugar: Once the hand pies are sufficiently chilled, I remove them from the refrigerator. I then lightly brush the tops of each hand pie with the egg wash. Following that, I generously sprinkle them with turbinado sugar (or granulated sugar). The turbinado sugar adds a lovely sparkle and a bit of extra crunch.
- Bake: I carefully transfer the baking sheets with the prepared Pumpkin Hand Pies to the preheated 400°F (200°C) oven. I bake them for approximately 18-22 minutes, or until the crust is deeply golden brown and the filling is set. The exact baking time can vary depending on your oven and the size of your hand pies, so keep an eye on them. I often rotate the baking sheets halfway through for even browning.
- Cool: Once baked to perfection, I remove the golden-brown Pumpkin Hand Pies from the oven. I let them cool on the baking sheets for about 5-10 minutes before carefully transferring them to a wire rack to cool completely. Resist the urge to eat them immediately! The filling will be extremely hot, and it needs time to set properly. While delicious warm, they are also excellent at room temperature. These pies are best enjoyed the day they are made but will keep well in an airtight container at room temperature for up to 2-3 days. They also freeze wonderfully after baking; simply thaw and reheat gently for a quick treat.
Conclusion:
As we wrap up our delightful journey into the world of autumn baking, I truly hope you’re feeling as inspired as I am to get into the kitchen and create something truly magical. This recipe for homemade Pumpkin Hand Pies is more than just a collection of ingredients and steps; it’s an invitation to capture the very essence of fall in a convenient, portable, and utterly delicious package. Forget the fuss of a full-sized pie that requires plates and forks; these charming individual treats are designed for effortless enjoyment, whether you’re cozied up on the couch, hosting a festive gathering, or simply need a sweet pick-me-up on a crisp afternoon.
I find that what makes these particular hand pies a must-try is their incredible balance of textures and flavors. Imagine: a golden, impossibly flaky crust that shatters with every bite, revealing a warm, perfectly spiced pumpkin filling that’s sweet without being cloying, and utterly comforting. The aroma alone as they bake is enough to fill your home with a welcoming, autumnal hug, making your kitchen the most inviting place to be. They’re a fantastic way to enjoy all the beloved flavors of pumpkin pie, but with an added element of fun and portability that traditional pies simply can’t offer. You’ll quickly discover that once you taste the homemade goodness, you’ll never look back at store-bought alternatives. There’s an undeniable satisfaction in crafting these little gems from scratch, knowing every ingredient is fresh and every bite is made with love.
Serving Suggestions to Elevate Your Pumpkin Hand Pies:
While these delightful treats are absolutely fantastic on their own, warm from the oven, there are so many ways to enhance your enjoyment:
- A Scoop of Vanilla Bean Ice Cream: The classic pairing. The cold, creamy ice cream against the warm, spiced pie is pure bliss.
- A Dollop of Freshly Whipped Cream: Lightly sweetened and perhaps infused with a hint of maple syrup or bourbon for an extra layer of flavor.
- Drizzled with Caramel or Maple Glaze: A simple drizzle of warm caramel sauce or a quick maple glaze (confectioners’ sugar whisked with maple syrup) adds an extra touch of sweetness and visual appeal.
- With Your Morning Coffee or Afternoon Tea: They make an exquisite breakfast pastry or an elegant accompaniment to your favorite hot beverage.
- A Sprinkle of Sea Salt: For those who love the sweet and salty combination, a tiny sprinkle of flaky sea salt on top of the pies just after baking can really make the flavors pop.
Creative Variations to Spark Your Culinary Imagination:
Don’t be afraid to get creative with your Pumpkin Hand Pies! The beauty of this recipe lies in its versatility:
- Spice It Up: Experiment with different spice blends. Try adding a pinch of cardamom, allspice, or even a touch of white pepper to your pumpkin filling for a unique twist. A chai spice blend would also be incredible!
- Cream Cheese Swirl: For an extra decadent treat, try adding a small dollop of sweetened cream cheese (mixed with a bit of sugar and vanilla extract) to the center of your pumpkin filling before sealing the pies.
- Chocolate Chips: Who doesn’t love chocolate? A sprinkle of mini chocolate chips mixed into the pumpkin filling or added to the top before baking can create a delightful surprise.
- Nutty Crunch: Add some finely chopped pecans or walnuts to the filling for added texture and a nutty flavor profile. You could also sprinkle them on top of the pies before baking.
- Different Shapes: While classic half-moons are lovely, feel free to use fun cookie cutters (like leaves, pumpkins, or even stars) to make your hand pies extra special, especially if you’re baking with kids.
I genuinely believe that this recipe for Pumpkin Hand Pies will become a cherished part of your fall baking traditions. It’s perfect for gifting, ideal for school lunchboxes, and absolutely wonderful for treating yourself. There’s something incredibly satisfying about taking that first bite of a warm, homemade hand pie, and I truly can’t wait for you to experience that joy.
So, please, gather your ingredients, set aside some time, and embark on this delicious baking adventure. I encourage you to try this recipe, make it your own, and most importantly, share your experience! I would absolutely love to hear from you. Did you try a new variation? What was your favorite part? Share your photos and comments on social media, or leave a comment below. Let’s celebrate the magic of homemade fall treats together!
Frequently Asked Questions (FAQs)
Can I make the Pumpkin Hand Pies ahead of time?
Absolutely! These pumpkin hand pies are fantastic for making ahead. You can prepare the filling a day or two in advance and store it in an airtight container in the refrigerator. You can also assemble the entire pies, unbaked, and place them on a baking sheet lined with parchment paper. Freeze them until solid, then transfer them to a freezer-safe bag for up to 1-2 months. When ready to bake, you can bake them directly from frozen, adding a few extra minutes to the baking time.
How do I store leftover Pumpkin Hand Pies?
Once baked and cooled, your pumpkin hand pies can be stored at room temperature in an airtight container for up to 2-3 days. For longer storage, or if your kitchen is particularly warm, I recommend storing them in the refrigerator for up to 5 days. To reheat, simply warm them in a microwave for 15-30 seconds or in a toaster oven at 300°F (150°C) for about 5-10 minutes until warmed through and the crust is crisp again.
Can I use store-bought pie crust for this recipe?
Yes, you certainly can! While I highly recommend a homemade crust for the best flavor and flakiness, using store-bought refrigerated pie crust or puff pastry is a fantastic shortcut that will still yield delicious results. Just make sure to follow the package directions for handling and baking, and adjust the baking time as necessary, as commercial crusts can sometimes bake faster.
What if my pie filling is too runny or too thick?
The consistency of your pumpkin filling is key. If your filling seems too runny after cooking, you can gently simmer it for a few more minutes over low heat, stirring constantly, to allow more liquid to evaporate. If it’s too thick, you can whisk in a tablespoon or two of milk or cream until it reaches a smooth, spreadable consistency. Remember, it will also thicken as it cools.
How do I prevent the filling from leaking out of the hand pies?
To prevent leaks, there are a couple of crucial steps: First, ensure you don’t overfill your hand pies. A tablespoon or two of filling per pie is usually sufficient. Second, make sure the edges of your dough are firmly sealed. Pressing them together with the tines of a fork not only creates a decorative edge but also crimps the dough tightly, minimizing the chance of any delicious pumpkin escaping during baking. Also, make sure your filling is completely cooled before assembling the pies.
Can I freeze the baked Pumpkin Hand Pies?
Yes, baked pumpkin hand pies freeze beautifully! Allow them to cool completely, then place them in a single layer on a baking sheet and freeze until solid. Once frozen, transfer them to a freezer-safe bag or container, separating layers with parchment paper, for up to 2-3 months. Thaw them at room temperature or reheat from frozen in a low oven (around 300°F/150°C) until warmed through.
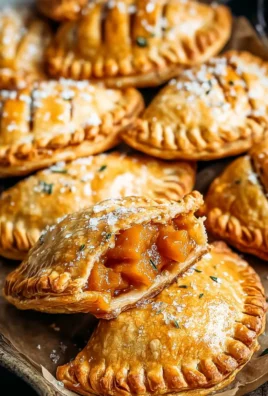
Pumpkin Hand Pies
These pumpkin hand pies wrap fall flavors in flaky pastry perfect for autumn celebrations. Each bite brings creamy pumpkin filling and buttery crust making them ideal for parties or cozy treats at home.
Ingredients
-
2 ½ cups (300g) all-purpose flour, plus more for dusting
-
1 tsp salt
-
1 cup (226g) unsalted butter, very cold and cubed
-
½ cup (120ml) ice water, plus 1-2 tbsp more if needed
-
1 tbsp granulated sugar (optional)
-
1 (15-oz / 425g) can pure pumpkin puree
-
½ cup (100g) light brown sugar, packed
-
¼ cup (50g) granulated sugar
-
½ cup (120ml) heavy cream
-
1 large egg
-
1 tbsp cornstarch
-
1 tsp ground cinnamon
-
½ tsp ground ginger
-
¼ tsp ground nutmeg
-
⅛ tsp ground cloves (optional)
-
¼ tsp salt
-
1 tsp vanilla extract
-
1 large egg yolk
-
1 tbsp milk or water
-
2 tbsp turbinado sugar (or granulated sugar)
Instructions
-
Step 1
In a large bowl, whisk flour, salt, and optional sugar. Cut in very cold, cubed butter until mixture resembles coarse meal with pea-sized butter pieces. Gradually add ice water, 1 tbsp at a time, mixing gently until dough just comes together. Do not overmix. Divide dough into two discs, flatten, wrap in plastic, and chill for at least 1 hour. -
Step 2
In a medium bowl, whisk pure pumpkin puree, heavy cream, and large egg until smooth. Stir in light brown sugar, granulated sugar, cornstarch, ground cinnamon, ground ginger, ground nutmeg, optional ground cloves, and salt. Whisk until fully incorporated and smooth. Stir in vanilla extract and set aside. -
Step 3
Preheat oven to 400°F (200°C). Line two large baking sheets with parchment paper. On a lightly floured surface, roll one chilled dough disc to ⅛-inch thickness. Using a 3.5-4 inch round or square cookie cutter, cut out shapes. Gently gather and re-roll scraps to cut more shapes (aim for 24-32 total pies). Place half of the shapes on prepared baking sheets. Spoon 1-2 tbsp of pumpkin filling onto the center of each, leaving a ½-inch border. Lightly moisten edges of filled dough with water. Top with remaining dough shapes, aligning edges. Press to seal, then crimp edges with a fork. Make 2-3 small slits on top of each pie. For best results, chill assembled pies for 15-20 minutes. -
Step 4
While pies chill, prepare egg wash by whisking 1 large egg yolk with 1 tbsp milk or water. Brush tops of chilled hand pies with egg wash and generously sprinkle with turbinado sugar. Bake in the preheated oven for 18-22 minutes, or until crust is deeply golden brown. Rotate baking sheets halfway through for even browning. Remove from oven and cool on baking sheets for 5-10 minutes, then transfer to a wire rack to cool completely before serving. Best enjoyed the day they are made, but store in an airtight container at room temperature for 2-3 days. Can be frozen before baking for up to 3 months; bake straight from frozen with added bake time.
Important Information
Nutrition Facts (Per Serving)
It is important to consider this information as approximate and not to use it as definitive health advice.
Allergy Information
Please check ingredients for potential allergens and consult a health professional if in doubt.
Leave a Comment